Fibreglassing the Bottom
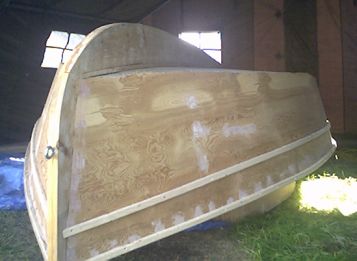
05-July-04 Just before supper my neighbour and a couple of his friends and myself turned Little Squirt Too over. I was really worried about this phase of construction. I was expecting the roof to cave in or the boat to be so heavy someone would get hurt and a dozen other things. It went over without a hitch. The four of us had no trouble turning her over and she rested level on her cabin without a problem. Although I will still wedge some supports under her to take some of the strain off the cabin. The next step is to take the jig sau and cut trim off the hull sides before sanding them and rounding them off.
06-July-04 Used a belt sander to round out the keel and the sides of the hull where it joins with the bottum. The reason I am doing this is that I have read in several places that fibreglass does not stick as well where there is a sharp corner. I reset some screws that were sticking out and just removed a few others. According to the Stevenson's video the number of screws used is overkill anyway and removing a few will not cause problems. I then started to fill in the screwholes and joints in the bottom with marine filler. I am mixing it with lots of hardener so it will set very quickly. In the plans and video the Stevenson's I beleive refer to this as applying it hot. I put on the filler in small batches and once a particular section is hard to the touch I plane over it with a sureform scraper. Do it when the filler is too soft and it clogs your scraper and all the filler comes off. Wait too long and it will be too hard for the scraper to remove. I usually wait till it feels hard to the touch. The Stevenson's recommend that you wait till you can scrap it with a finger nail and it is white where you scraped.
10-July-04
Finally finished filling in all the screw holes below the lower rub
rail where the fibreglass will go. The only real problem I had was
around the keel. No tool I had seemed to be suitable. I finally just
mixed the auto body filler and put on two pairs of gloves and filled
in the joint by the keel by scooping it up with a finger and applying
it that way. Slow but effective. I must have worn out about 30 pairs
of disposable gloves before I finally finished.
13-Jul-04 Yesterday after work I started putting the cloth down and cutting it too shape. I finished this morning. It was not as difficult as I thought it was going to be. I was given the impression that fiberglass cloth unraveled easily. I had no trouble with that except once when a spot didn't cut cleanly and I gave it a yank instead of cutting the thread. A small section of fiberglass cloth in that area just unraveled instead of breaking. After that I was careful to cut not pull and I had no more trouble with cloth unraveling. I am also putting a small strip of cloth on the bottom of the keel for a little bit of extra protection for the part of the boat that takes the most abuse when I go ashore. I finished putting down the cloth this morning. And now I'm ready to apply the epoxy.
13-Jul-04 Well for better or worse the epoxy is on the bottom. It was a very difficult and hot job. I'm extremely glad it's done. Now hopefully I didn't mess up. For protection I wore a old combat uniform that was obsolete in the military and I could throw away when I was finished. I had a resperator with vaper and dust protection. I wore disposable gloves with kitchen gloves worn over them. I used one gallon of epoxy to do the bottom of the hull, and all I hope is that it was enough. I had bought slow hardener because I had never used epoxy before and I figured I could use the extra time. I never had any problem with the epoxy hardening before I was finished. Although I only mixed small batches at a time. Between 5 and 10 pumps depending on what I was doing. I used a corner roller at the keel at first but the sponge started to come apart. I ended up doing most of the courner between the bottom and the keel with disposable brushes. It took about 4 brushes. I did the rest of the bottom with rollers. BEWARE OF THE HEAT CAUSED BY THE EPOXY SETTING. I threw the rollers in the garbage and when I went back to check the boat the garbage was smoking. I took the stuff and threw it in a metal dustbin I have.
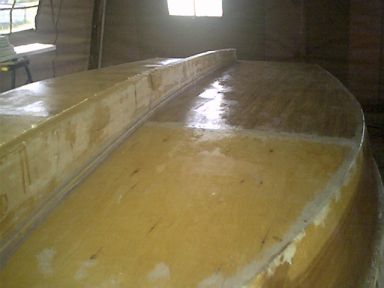
14-July-04
Got home from work and used my belt sander and a rough belt to remove
a few bubbles near the rub rail and one on the bottum of the hull. I
didn't consider these to be a problem since all but one were above
the waterline. I then changed the belt to a finer grade and sanded
the entire hull. This is where I ran into problems. The cloth is
showing in spots. I'll have to recoat these areas or the entire hull.
It's hard to tell because of all the dust on the hull. Also on the
transom where the cloth was folded over at the corners the fibreglass
only abosrbed into the outer layer. When I sanded that area the outer
layer sanded through in a couple of seconds and the unprotected cloth
under it disappeared in a instant.
What I should have done was
to either ensure that the cloth was completely soaked in epoxy before
folding it over or cut the flap away leaving a gap then taking a
strip of fiberglass cloth and epoxying it into place separately. To
repair this damage I will sand away all the flap and put a separate
piece of cloth in place to cover the wood. I took a bucket and dumped
water over the hull untill I was sure all the fiberglass dust was
washed away. Tomorrow when it is dry I will be able to better apraise
the situations and will make the necessary repairs.
15-Jul-04 Today I put on the second coat of epoxy. I did this because I was unhappy with the quality of the first coat. There were too many areas where it was white from the cloth showing through. I also had to repair the corners where the transom joined the hull sides. I sanded away all the rough area caused by the way the cloth was folded over when I did the first coat of fibreglass and cut strips of fibreglass cloth to cover this area. I then used a disposable foam brush to soak them with epoxy. I used a foam roller to put the second coat of epoxy on the boat. Originally I used a ordinary cheap paint roller but I found it soaked up too much expoxy. The foam roller for smooth surfaces socked up less which is important. It is costing me about $120 dollars a gallon for the epoxy and hardener. I used the same roller handle I had used for the first coat and it would not turn because of the old epoxy which had turned solid in the mechanisum. I kind of just dragged it along on the hull. This actually worked well till near the end when it started to come off the handle, and I had to repeatedly smack it back into place. Quite a bit of fowl language was heard at that point. It's done now. Tomorrow when the epoxy is dry I need to sand away one or two bubbles I have missed up to now. I will then use some marine filler to cover in the rough spots and fill in the holes in the cloth where I had removed bubbles. I figure I will never get a perfect coat and if I keep trying I will have a layer of epoxy on my hull a inch thick.
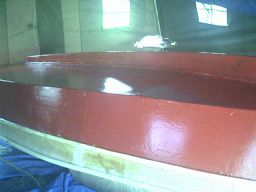
16-Jul-04 Did repairs in finish of hull and put on first coat of read below the rub rail. So I can duplicate the colour here is the info on the can.
98RR 12/480 Victorian Red
67480 Walmart 1 Ga
Colourplace Int/Ext Alkyd G1
Blk 0 P2 FFR8 P48
Mag 4 P36 Wht0 P42
19-July-04 I painted the first coat about 4pm friday last. As of this mourning which is Monday the pait is still sticky and I still can not put on the second coat. This is really delaying things.
22-July-04 I can't wait any longer. I put on the second coat despite the fact the the first coat is stil sticky.
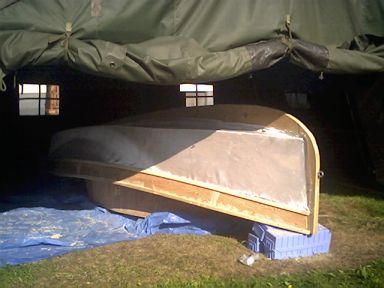
23-July-04 I checked the second coat first thing this morning. It is drying much faster then the first coat was. It is nearly dry to the touch. Even where it was still sticky where the first coat was. If by some miracle it is dry tonight I will put on a third and final coat. If not it is only going to get two coats. I am running out of time. It is friday now. I am going to Ottawa tommorrow to check out our PMQ (Military Houseing) tommorrow so the boat will have till Wed next to dry. At that point I will arrange for the boat to be flipped upright so I can finish the top half.
10-Oct-04 Am painting the cockpit and interior floor of Little Squirt Too with the following paint.
Rolling Hills 90YR 38/239 67487 Walmart 1 gal Colourplace Int/Ext Alkyd Gl BLK-0 P18 YOX 1 P 8 OXR 0 P30 WHT7 P10