Little Squirt Too Sails
17-Apr-2006 I'm afraid I have been very slack in maintaining my site however I will try and fill in as much detail as I remember. I had spent some money I had gotten for christmas on a sail kit from HP Solutions.
http://members.aol.com/polysail/HTML/index.htm
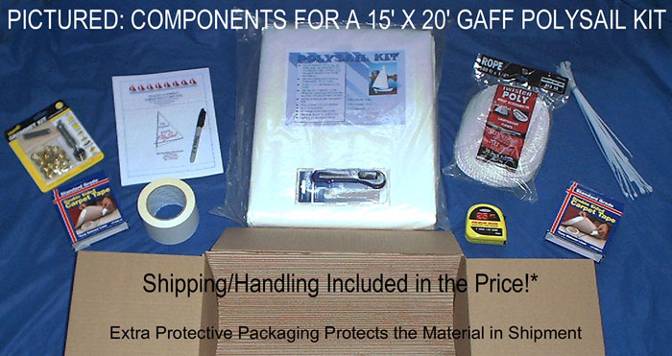
Here is a picture of the components that come in one of the kits. The picture comes from HP Solutions website. It is not the same kit I got but it gives a good idea of whats included.
I got the 18x24 economy kit. It included.
1. A large 18x24 white tarp. To me at least it seemed like a
ordinary white tarp.
2. A grommet kit made by Lord & Hodge
Inc. (WWW.LORDAND HODGE.COM). The kit came with a cutter and stamps
for putting in the grommets. I found the kit to be easy to use. It
comes with 24 Grommets with a inside diameter of 3/8 inch.
3.
Also included was a extra 24 grommets from the same company.
4.
Three rolls of double side carpet tape. Indoor/Outdoor. Duck brand.
1.41 inch by 42Ft.
5. I also received a large roll of vinyl tape
which according to their site is not included.
6. Several sets of
instructions on general sails, and weekender sails. I also received
for some reason a old June 15 2002 copy of messing about in boats.
Here is a list of the items I had to supply myself.
1. Sharp knife or scissors. I used a pair of scissors.
2. Meal
Tape Ruler.
3. Erasable Markers.
4. Baten for drawing the
curves. I used the left over 3/4 inch pvc pipe I had used when I had
made the rings for the spar.
5. Sail needle and strong thread.
6.
Hammer.
7. Rope. I used cheap 1/4 inch nylon rope.
On the 8 Apr 2006 I decided to start with the jib since it is the smaller of the two sails and I would be able to make room to make it in my living room. Charlotte was gone to work at H&R Block and Jeanette was at Saturday Time away so I would have no distractions. I cleared the area I needed by moving stuff around in the combined kitchen/livingroom area. I then found I could not open the tarp the way I needed. I took it outside and spread it out on the ground. I then refolded it so that I could unfold only the side that I needed for the Jib.
Before I go any further I should let you know that I hate the sails as made in the plans from the stevensons. I had followed the plans when I had made my 3-in-1. It was flat and worked poorly in mild winds. Also the adhesive begain to fail after the first season and I was constantly regluing the tape. The stevensons plans suggest sewing as optional. I consider sewing to be essential if you want any time at all out of the sail. The plans that came with my sail kit say that adhesive will no cling for more then a couple of years to polytarp and I agree. I used the dimensions from the stevensons plans and followed the directions that came with the sail. If you follow the plans you will end up with a properly shaped sail which is more like a aircraft wing then a flat surface.
Okay enough ranting. Back to the sail. I marked out the dimensions as per the stevensons directions with two alterations. I added a couple of inches for the darts. Darts are small folds which are sewn into the sail to help give it a 3 dimensional shape. The kit I received included dimensions including darts for the Weekender. I put the dart for the jib in the same place with the same size despite the fact I was building a pocket cruiser.
I am not going to go through every step that I did after that. It is very well described in the plans which comes with the sail kit. However I did not follow the plans when it came to the darts. I sewed the darts into the sail as described in Jim Michalak's book Boatbuilding for Beginners and Beyond. He also describes a way of reinforcing the corners of the sail using denim cloth. I cut up a pair of jeans that my daughter had out grown, and used that to reinforce the corners.
One warning. When using the grommet kit make sure you put the base of the unit facing right side up or you will have a extemely difficult time trying to get the kit apart again after you have hammered it together.
Right now I am sewing every seam on both the inner and outer edges. This sail is not coming apart.