24-Jun-04 I measured and cut the starboard seat panel. I started
with the one with the hatch. I find the plans extremely vaque at this
point. If the panel is put in at the specified spot at a 90 deg angle
it will cover over the hatch way. Also none of the measurements agree
with the plans. I assume it is because of discrepancies that have
crept into construction. However the thing that annoyed me most is
that I could not find in the plans what thichness of plywood I should
be using. I decided to use ½ board since the seats will
probably take more abuse then any other part of the boat.
27-June04 Have cut out the hatches in the panels. I now have to
cut out the stringers to hold them in place. Because the Aft cabin
bulkhead does not seem to be square I will have to measure the angle
for each pice of stringer individually. Should be lots of fun. Ha Ha.
29-June-04
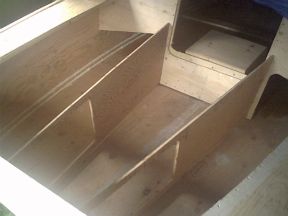
Have finished setting up the stringers for the transom, cabin
bulkhead, and the bottum of the boat. I have not yet glued or screwed
any of the parts in place. I figure it will be easier to fit the
small bulkhead which separates the storage compartment from the part
under the seat where you put your feet where you sleep if you can
move the other pieces around. Once everthing is cut out and stringers
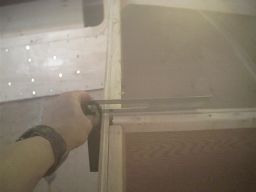
are attached I'll glue and screw everything. One point. I have a tool
called a Sliding-T-Bevel. For this part of construction the took is
priceless. It is cheap and has saved me a great deal of time.
Actually if I did not have this tool for measuring the angles for the
stringers I do not know what I would have done.
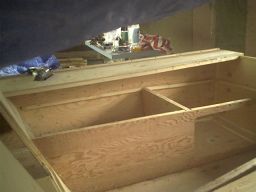
01-July-04 Attached the stringers to the bulkheads I have cut up
to this point. I am now going to mark out where the bulkheads are and
remove the bulkheads. I will then drill the holes to mark where the
screws will go so that I can blind screw from the outside of the
bulkhead. I will then put them back into place and glue and screw
them all permanantly into place.
01-July-04
Have finished permanantly attaching the bulkheads. When you get to
this stage of construction whatever you do don't try to put these
panels in place by yourself. While you are under the boat putting in
the screws the panels you can no longer see are shifting out of
place. I nearly went insaine trying to get these panels into
position. The next step is to install the stringers that hold the
seat panel. I figure they will all be ordinary stringers with the 90
deg part against the bulkhead except fot the stringer that attaches
to the side of the hull. The angle will have to be measured with a
sliding-T-square and custom cut.
02-July-04 No matter how hard I try I can't get the stringer
against the bulkhead to line up so that it looks right. So this is
what I am doing. First I cut out the part of the seat that you
actually sit on. Like the rest of the seat assembly I found the plans
close to useless. Measure all the angles and distances youself. Take
your time. These planforms are one of the more difficult parts of
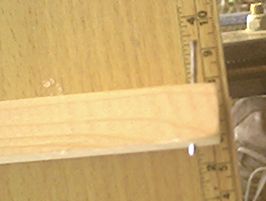
assembly. Once I finish this I will have to measure the curve against
the hull side so that I can cut it to fit. For this I made a tool by
taking a small piece of wood a driving a small nail through the end.
02-July-04
Well making the seat top first did not help in lining up the
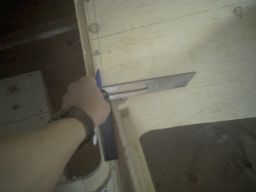
stringers against the bulkhead and the hull sides so now I'm going to
try this. First I'll take my sliding-T-bevel and measure the angle of
the centre devider in the storage compartment.
I
then transfer the angle to the aft cabin bulkhead and will install a
stringer there.
02-July-04
Installed the stringer against the hull. It's angle had to be custom
cut the same as most of the other stringers for the seats.
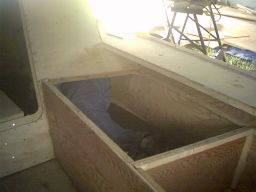
03-July-04 Finished installing all the stringers on the starboard
side. The opening for your feet to go through is not as large as the
area enclosed by the stringers. I am going to very carefully expand
the opening as large as possible. The danger here is that if I am not
very carefull I could cut a hole in the side hull of the boat.
03-July-04
Well I broke my last jig saw blade cutting the opening. Since I don't
want to lose the time it would take to drive out and get a new one
I'm going to just install the stringers for the port side seat and
worry about expanding the openings later. Well I found some more
blades and finished the opening. Here's a picture with me in the
sleeping position. If I lie on my side my hip scraps on the top of
the opening when I move around, and let's not forget I raised the
seats two inches from plans. That means my opening is larger as well.
I don't think it would be really comfortable to sleep in but it will
do in a pince, and there is so much room in the rest of the cabin I
probably won't have to use this area for sleeping anyway. It will
probably just be used for storage.
31-July-04
I have not updated this page in a while so here's a catch-up.
Before doing anything else I fibreglassed seams in the storage
compartments. I figured it would be easier this way. I then
installed the stringers that the back panel would attach to. I then
put the bottum panels on with glue and screws. The plans say to
put the stringers for the back panel on after installing the bottum,
but I decided it would be easier to do this first. Because I wanted
the back panel to curver the same as the top deck did and because
none of the measurements in the plans seem to apply anymore it took a
great deal of care when drawing where the stringers were to go.
I have also installed the back panel on the starboard side. I had
to carefully measure everything for it too fit. I love my slideing T
Bevel for jobs like this. I decided I did not like the wall as high
as it says in the plans so I have lowered it two inches to compensate
for the two inches I raised the seats, and another two inches because
I did not like the high walls. We'll see if I'll regrete it later.
04-Aug-04 I have finished installing the back panels on the seats. The plans call for a fancy wooden piece which attaches the cabin to the back panel. I don't have time to do this. I put a stringer on the inside of the back panel attaching to the cabin, and will use body filler to fill and shape the gap on the outside. Also instead of putting the wooden stops in the inside of the openings for the cockpit storage compartment doors I cut two pieces of plywood just slightly larger then the piece I cut out which are supposed to be the doors. I glued them together. Instead of hinges I will use the clasps which will hold them in place. This way the doors can be removed completely out of the way instead of being opened.