Many people get quite nervous at the thought of
lofting. However although it is important to
get it right it is not as difficult as it
seems at first sight. The most important thing
is relax, and take your time. Double check everything, and
you should have no problem.
First Question is probably what is lofting.
Lofting is the process of converting a small
diagram and instructions in your plans into a full
size diagram on your plywood that you can cut out.
It is done because with inexpesive plans such as
the weekender it is not practical to send full
size diagrams of the components for you to cut out.
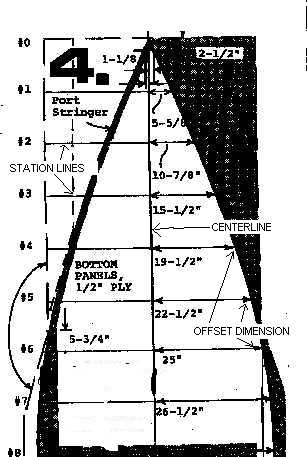
Okay how to loft. Take a look at the diagram below, and we'll
walk through how we would loft this diagram.
1. First we would have to draw the CenterLine.
This is generally drawn in the center of the
plywood or board. It is usually parrallel to
the longer edge of the plywood sheet. However
read the plans carefully to determine where this line
goes. The center line is also called the reference line.
2. Next we have to draw the Station Line.
These line are drawn at a 90 degree angle from
the center line. This are NORMALLY drawn 12 inches
apart. Each station line is given a number so
if you ever hear of a problem in lofting at
station 13 then you know the problem is at that
station line. Another thing to watch is that
the first station line is not always at the edge of
the board you are lofting. Study the diagram and
instructions carefully.
3. On each station line you will see a measurement.
These are the Offset Dimensions. You carefully
measure away from the center line the distance of the
measurement and put a mark in this spot. Once you have done
this at all the points double check everything. This is
one job where it pays to be paranoid.
4. Put a small nail at each point where the
offsets are marked on the station lines. Then you
use a batten (usually a 3/4"x3/4" stringer) to
mark the curve. You do this by placing the stringer
against the nails from the inside of the curve. Push
the batten against the nails. Mark the curve by
drawing along the batten. You will probably need
someone to hold the batten while you draw. If alone
you can use a second small nail at each point to hold the batton
in place. The curve when lofting should be smooth.
If it is not you may have to move a nail a very small
amount. If the nail has to be moved more then 1/4" look for a
error in your lofting. For tight curves you
can use a metal ruler or a thin batten. I've used
pieces of cardboard for very small sharp curves.
The best way to check the smoothness of a curve is
too put your eye close to the surface near one end of the curve.
LINKS
DUDLEY DIX YACHT DESIGN(THE CASE FOR LOFTING) -A comprehesive page detailing lofting. It
may be a bit advanced for the flat bottum boats
that are detailed in this site. Still worth
a look. It is the first of three pages. You have
to pay to see the other two pages.